)
| NEW | NEW |
| Original Fuel System | Holley HP Terminator | Dual Sync Distributor (Good & Bad) |
36-1 Crank Trigger | Powerjection III A Relic Now. |
Mass-Flo System Support Questionable. |
Fuel System
I started this project using the Ford EECiV fuel system, which I hated the look of. It just didn't look right in the engine bay. However, I did need it to work and was sure I was going EFI instead of a carburetor. The latest system, Holley EFI, is at the top of this page with the other system(s) I used toward the bottom.
)
)
)
)
)
I ran the fuel lines after the body was on. This made it a little more work but a neater finish was accomplished as I knew where everything was going and what I wanted to do in the engine compartment.I reused the Mustang fuel clips which keep the lines tight and together. Everything was placed for easy access later. Certain areas had covering for extra protection from possible rubbing.
Update May 2017
After making the passenger footbox bigger during the 2017 re-build, I needed to make new fuel lines to clear the footbox. I basically ran them the same way only this time tucked them inward more toward the engine just above the 4" frame and also shortened them a bit to make it easier to access near the starter. Still using the stock Ford type fuel filter and 5/16" feed and 1/4" return lines to the tank. I also put new EFI rated fuel hose to connect the lines to the filter and tank using the stock Ford EFI ends.
)
)
Latest and hopefully the last...Holley Terminator EFI

)
)
)
)
)
)
)
)
What can I say. I'm just someone who wants the best performance and look of a carburator, without the use of jets. Being a computer type person and being in the auto industry my whole life, I've seen lots of changes. One of the best in my opinion has been the ever increasing technology of electronic fuel injection. I've always been interested in new (better) features and this time I think I've nailed it. The Holley Terminator EFI is the latest EFI unit I've invested in.
My old Powerjection III unit is good, but when driving at altitude for lengthy times, I'd have to put another "tune" in it to make it run smoother. This was due to the fact they don't have a barometric pressure circuit figured in their system. If they were to incorporate that, it would be a very good unit for all around driving. Using it from sea level to around 3500' seemed to be just fine and I could do what I needed, even on track days. However, I (like a lot of people) wanted more. Thus, the Holley Terminator EFI.
After talking to the Holley tech's at SEMA the last two years, I decided that this was my future fuel system. You don't need a laptop to program or view the system, but you can use one with the free downloaded software from Holley. I highly urge any buyer or user to definately use a laptop to fine tune the Holley EFI. It will be a royal PITA if you don't. Don't get me wrong, it will run and tune itself, but if you're looking to get the utmost out of it, use a laptop. I intend to use this as my tool just as I did with my other system.Once I got the Holley Terminator EFI I examined how I was going to install this in my completed car. The wiring harness is long, I have a CPU to install along with a relay and two fused power plugs. A few other items that connect to the programing controler and sensors.
First thing was routing the harness and seeing what my best options were. No room under the dash and to close to my MSD 6-AL2 box (a no-no for electonic units and ill advised from Holley), didn't want it in the passenger footbox and a 3/4" harness to route. Oh, btw, the harness is five feet long.
I decided to install the CPU in the trunk above the crossbar on the firewall. I made a temporary plate to mount the CPU to and then the chassis. I routed the harness through the top trunk deck and to the front of the transmission tunnel where it ended perfectly with the firewall. This is where the main connections to the EFI unit, ignition and sensors go. I also rerouted several wires through their harnes that came out in other areas so I could have them in a more desireable place on my chassis.I dieted the harness to put the relay and fuse near the CPU plug along with moving the battery lead and the two CAN connections to an area that allowed me to route them to my rear bulkhead glove box and be out of the way. Yeah, I voided my harness warranty but who cares, I sure don't. Just be careful what you do. I'm not afraid of wiring so I just followed my instinct and the wiring diagram.
Once the wiring was in place, it was time to do the two fuel lines. I didn't have to do too much here, just make two new ones. The main feed and the return. The entire EFI unit is ready to go other than that. I already had my pressure regulator so no big deal there. Next was connecting the linkage to make sure all was good. After making sure all connections were made and all looked good, it was time to start the programming.Connecting the handheld programmer (included) to the CAN wire connection, you turn the key on, follow the instructions in the manual, go to the Wizard screen, answer a few questions, cycle the key and then you're ready to start.
Once the engine is running, I had to keep it going a little by using the throttle and let the water get to it's operating temperature. I went through a few of the parameters to set the target idle speed as well as the IAC setting by adjusting the throttle idle screw. Pretty much what I expected with a new system. The engine seems to have really good response at idle without any drive time yet, and I want to double check all my connections and settings before driving. I let it run for 20 minutes while I went through some of the settings and starting the self-tuning process.Setting the TPS and IAC are the two most important things to do on this system. One out of whack will throw everything off. The IAC is sst to 30% from the outset which turned out to be too high for me. If I was to ramp up the throttle to 2500-3000 rmp and let it return, it would return normal. However, if I was to ease on the throttle above 1200rpm or more and the IAC got to it's 30%, it would hang at that position no matter what I did. The only way to reduce the speed was to turn off the engine. This got a me a little worried but after doing more reading and researching the Holley Forum, I found that 30% could be too much. Once back to the car and going to the Advanced Tuning and to the IAC Rampdown section and reduced the IAC Hold to 20%. Instant success and then went to 15% for a quicker release. Bingo!
I proceeded with doing some small driving around to let the system "learn" itself. Another important thing is to feed the Fuel Learn Table to the Fuel Base Table after doing some driving. This helps the system learn faster and should make your experience a little better. This should be done with a laptop and Holley software (which is a free download). You can datalog much easier from the laptop and do finer tuning than using the handheld unit, but you can get by with just the handheld.After two days of driving in different conditions and speeds, I can say this is one fine piece of fuel technology and I can only hope it'll get better. We have a few trips coming soon and that should help along with a track weekend for me in a few weeks. That will really tell me how it peroforms. I'll have to post an update in mid August 2014 after I get back.
March 2015A lot has happened since my last update, or lack of update, but it is worth the wait. The Holley Terminator EFI is FANTASTIC! After the installation and a few shakedown runs, I finally got the chance to take it to the track. I had a weekend at Sonoma Raceway (aka: Sears Point and Infineon) and did some data logging and fine tuning during my Saturday session.
The car ran great but needed a little enrichment at the higher WOT settings. Adjusting the A/F target ratio got me close and then I used the Learn Table to really see what was going on. After the day was done, I did some tuning on the laptop at the hotel and then updated the tune the next morning to see what it would do. The enging came alive even more and I was a happy driver all day long. Decided to let things be and logged the file for future track days.One really helpful feature is the graph table where you can select a range of cells from the Base Fuel and "graph" that area and really see what needs to be done, by either richening or leaning out the cells. You just click on a reference point on the graph and adjust up/down to meet or smooth out your target area. I usually save a file prior to any adjustments just in case I don't like the outcome. Easy enough to change it back and much cleaner than dealing with "jets".
The next outing was a trip to Lake Tahoe with our group of BACC all President members. This would be it's test of how it drives going from sea level to 8,000 ft and driving around at 6,200 ft for the weekend. I have no complaints. The system performed great and although I did do some minor tuning, it wasn't enough to say it wasn't worth the purchase. We had planned to be back in Tahoe in a week and decided to bring the car up again, and without messing with the tune, it performed just as it should have.Overall, I'm very pleased with the system and would highly recommend it. I know it's not for everyone, but those who wish to venture to EFI and have the look of a carburator will not be disappointed in the Holley Terminator EFI.
December 2015After running the Holley Terminator EFI for over a year and a half now, I can honestly say it performs! After purchasing the 3.5" LCD Touch Screen to allow me to see what's going on in real time eaiser (than a laptop), I was able to really define the parameters of the system. Depending on your engine setup, you can really "fine tune" the features of cruise, acceleration and idle to suit your needs. I was able to do multiple datalogging easier with the touch screen while driving by myself. Using a laptop really needs two people to make things easier and it can do it in REAL TIME!
I have had several long road trips and several track days to really learn and adjust the settings that perform the best in my car. By using the Learn Table and A/F Ration Table to fine tune areas. Now the engine runs smooth and strong throughout it's RPM range and I'm very happy. My future plans are to attend one of Holley's schools on the EFI systems.
I've been using the Dual Sync Distributor, part 565-202, for the last 10 years. I can't say how disappointed I am in Holley's attempt to make a decent product. This isn't a rant on their offerings, just more of "what did you intend to do" to help the consumer. This is a short history of what happened to my installation. I will add that I followed ALL of Holley's requests on wiring and making sure it was done as they prescribe without hesitation. As you read, you'll see the last several years have been the problem and nothing on the chassis or EFI wiring changed since the installation in 2014. I sent this following document to MSD with the latest failure in May 2025. I will say that MSD paid for the latest shipping and warranty on the distributor, although I never got an answer to what was wrong. MSD just sent the Order Verification Report back to me saying they put a new module and rotor on.
The following section is a brief history of my Dual Sync issues and this was sent with the last repair to MSD that only lasted 5 months!
I installed my Terminator HP system in 2014 and my first Dual Sync distributor in 2018. I added the white wire (A6) due to early Terminator HP not having this. After the Dual Sync was installed it worked flawless for over four years. Then the problems started. It failed (1) (May 2022), which I captured on a Log File and sent it in for repair. The first repair lasted one year and failed (2) (May 2023) again. At that time I purchased another brand new one and sent the original back for repair, again!
The new Dual Sync worked fine….for 13 months and failed (1) on an early morning drive to bkfst. June 2024 I had the car towed home and started diagnosing the problem. I took the cap off watched the LED’s and the Crank LED stayed constantly lit with key-ON cranking with no flashing at all, to let me know if the hall effect sensor was working. I had my original two-time repaired one on the shelf, so I got it out to install, and within 10 minutes had the car running again.
I checked the Crank LED on the new (failed-1) Dual Sync and it would stay solid lit when I spun it by hand or when in-between the shutter. I put it in the garage and didn’t touch it again for two months. I wanted to insure it was bad so I started to do some testing before contacting Holley. I plugged it into my chassis harness, turned the key on and was shocked. Not by the Dual Sync, but the fact that it worked “normal” while I was spinning the shaft! What?? The next step was to install it see if it worked. Surprise, it started and ran just fine. So, my question is, what the heck is going on? I will be reaching out to Holley to see what they have to say, but for me, it doesn’t make sense. All of this was captured on video as I went through the tests and did nothing other than cleaning it and inspecting, which isn’t much. It just sat on the shelf for two months. I will mention also that all my wiring has been the same since the inception of the installation and the fact I can run a MSD Ready-To-Run distributor, so I doubt it’s an issue other than a possible MSD 6-AL2 CD box being fussy or the HP ECU.
I already put my original (2) two-time Dual Sync repaired one back in and will wait to hear what Holley has to say. Just doesn’t make sense for a failed Dual Sync to just start working again. Problem is, for how long.
September 9, 2024 Contacted by MSD who told me they will repair the original failure for no charge. Told me there was an update to the parts. We’ll see. Also, due to just being over warranty, Holley is replacing the new Dual Sync with another brand new one at no charge. So, I should have two Dual Sync’s shortly. Both distributors were sent back!
October 2024 Upon receiving the repaired and new distributors, I installed my newly repaired (3) old Dual Sync in the car. We’ll see how long this will last. I’m keeping the brand new replacement on the shelf, just in case. I have gone through the chassis and ECU wiring extensively to insure it is wired per Holley’s recommendation and good chassis practices, especially on the Holley ECU side. All grounds and power are as they suggest. I even pin traced each ignition ECU wire to make sure there is no interference.
Update: May 3, 2025 My newly repaired Dual Sync that MSD repaired (3) last year (Sep 2024) just took a dump again! I can’t believe the crap they sell for such a PITA and lack of proficiency. This started acting like my first original failure seven years ago. It would work, cut-out, spit and sputter, run good, then quit. Start again and maybe work, maybe not. Lucky for me, I had the brand new one in the trunk with my “replacement tools” and was able to install the new one, while being on the side of a busy highway in about 20min. and got myself home safe. I made sure of timing and took it on a 100 mile run without a problem. However, I don’t trust this thing at all!
During part of the downtime with the Dual Sync problem and waiting, I did install my MSD Ready-to-Run distributor just to see if it was ignition or other problem. I made a simple plug-n-play pigtail so I could easily swap out the distributors without cutting wires. With the Ready-to-Run in, the car ran just fine. No miss, no hesitation, but it wasn't what I wanted. I did it to double check the operation, and, found that the Dual Sync was/is the problem. Again after getting a repaired/new Dual Sync back and re-installing, the problem eventually occurred and it was time to move on.
I am now determined to figure out how to install the 36-1 crank trigger unit. I don’t have an issue installing it, but have to figure out how to correctly phase the rotor. I will leave a Dual Sync in the car and use it as my "spark-a-lator". Just have to unplug it.
On an overall side note to all of this, the car sees about 3k miles per year!
So you can see, at first it worked like one would think and could rely on it being reliable on the road. It was only starting after that first failure that it reared it's ugly side and Holley and/or MSD couldn't come to some reasoning why it was failing. The parenthesis in white are the original unit failures and the one in red is the new one I purchased extra. So, you can see I've had no less than four failures in the past three years (2022-2025), with the latest one in just FIVE months!
Also, as a side note, the wiring on the car has NOT changed in over 14yrs. since installing the Holley HP Terminator. It has been wired as Holley recommends.
June 2025...New 36-1 Crank Trigger
I finally had enough of the Dual Sync drama and got around to installing a Holley 36-1 Crank Trigger, part# 556-115. I don't need the cam sensor because I'm using a throttle body setup and not port injection, although my Holley HP is equipped to do so. I will keep the Dual Sync distributor in, but only to distribute spark. It will be unplugged and used as my oil pump drive and "spark-a-lator" as I call it.
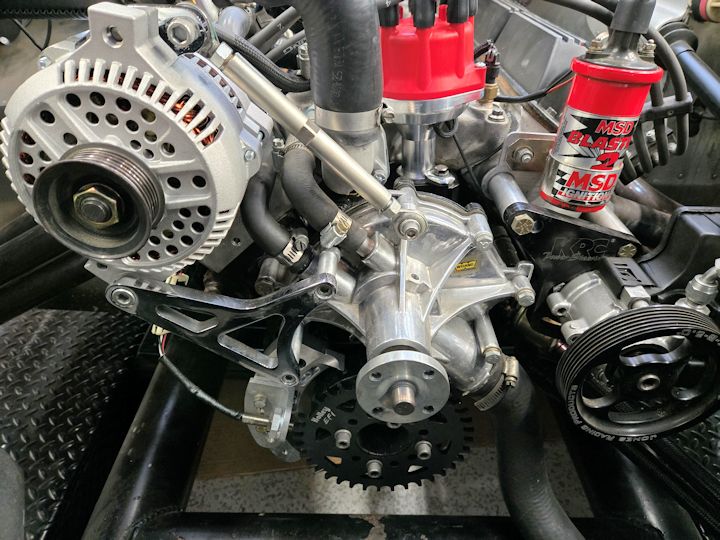
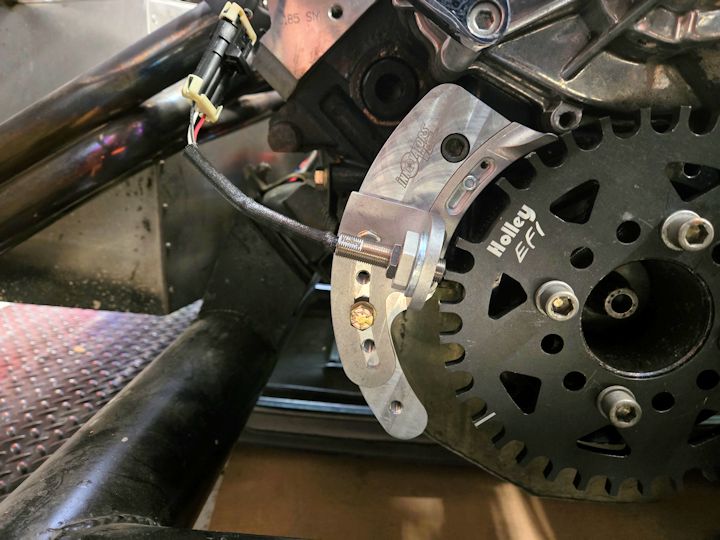
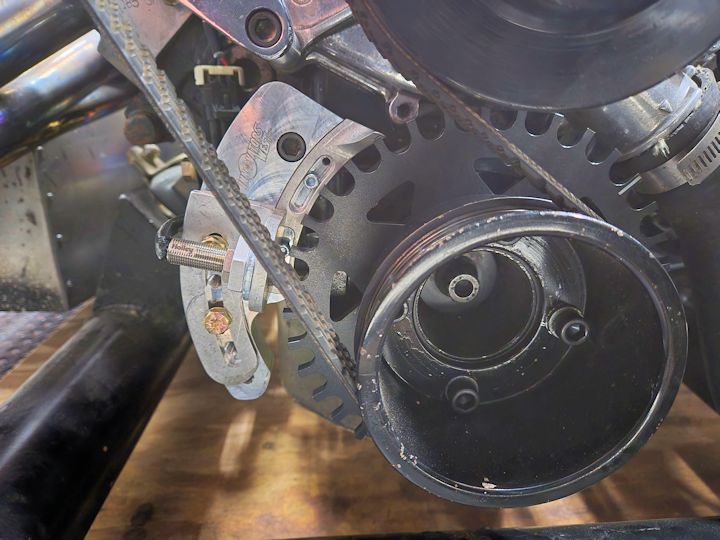
The Holley 556-115 kit is nice, but you may have to make some modifications depending on your setup. For me, I have a ATI 918948 adjustable timing pointer right where the Holley sensor arm would be installed so that became a problem. I have a buddy who could make me a custom bracket, but after doing some research, I found a perfect part! I will be using a Innovators West Crank Trigger bracket, part# 931-375, which is made for 3/8" bolt holes". The kit has the adjustable timing pointer built into its arm, which takes the guesswork out of fabricating your own. My Holley hall effect sensor is a 12mm x 1.0 pitch and needed an adapter for the 3/4" -16 thread on the Innovators West arm. They also sell a Sensor Bushing to allow the use of the Holley sensor. I call this a win-win situation!
The Holley trigger wheel is about .250 thick so I needed to have my buddy fab up some new longer spacers for my alternator and power steering brackets as well as a spacer for my water pump pulley. I also had him make some custom spacers to place the bracket in the proper position for the sensor/wheel setting. Other than that not much had to be done.
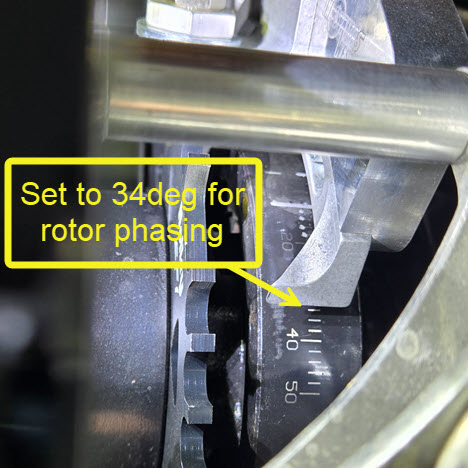
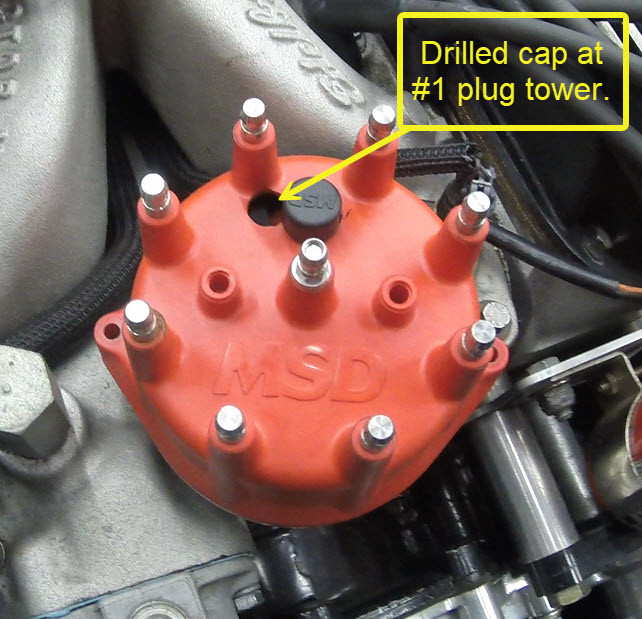
I was able to rotate the trigger wheel to allow my sensor to be higher toward the alternator and hopefully not be in the path of road debris. I then removed the lower end of the "dogleg" because I wouldn't be changing my setup, although I still have enough to move the sensor down if needed. Once done and sensor installed and spaced to .050", I checked rotor phasing to #1 plug. I took an old cap and drilled a hole at #1 tower so I could see the rotor and make sure it was pointing to #1. I set the crank at 34deg. and rotated the distributor a little to line up the rotor to the tower and locked the distributor down. All the timing adjustment will come from the sensor position or adjust from the Timing Offset timing within the Holley software.
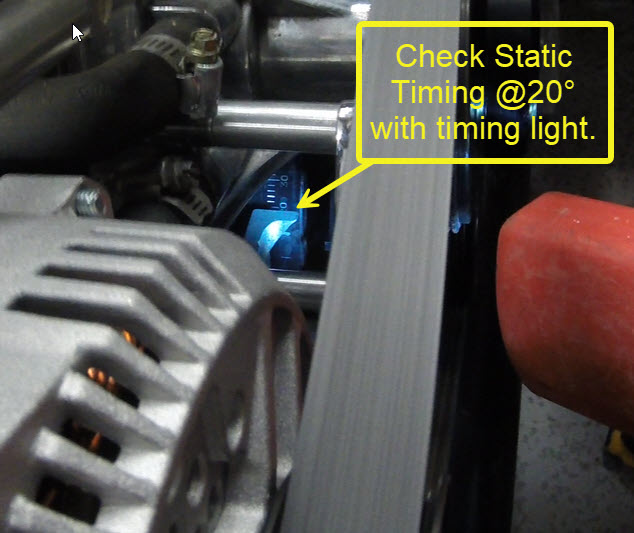
Once satisfied, I connected my timing light, set static timing to 20deg. and fired it up. It started fine and the timing was within 1/2deg of what I set. I was thankful it all worked well and the distributor rotor was firing at #1 tower! I will now get all my new spacers, etc. get them installed and do the fine tuning and adjusting.
Installation Instructions:
Rotate the engine to TDC on #1 cylinder. Remove any timing bracket you may have that will hinder the sensor bracket from being installed. Either you'll have enough room to keep a stock timing pointer and add the kit trigger bracket, or you'll need to remove it and use a bracket that will incorporate the timing pointer. My setup with a Ford Boss "Big Bore" block would not support just a stock pointer. I was using a ATI 918948 adjustable pointer. The Innovators West Crank Trigger bracket, part# 931-375, which is made for 3/8" bolt holes (they make the same for 5/16" bolts), is installed to the lower passenger (right) side of the engine, in place of any other pointer you may/may not be using.
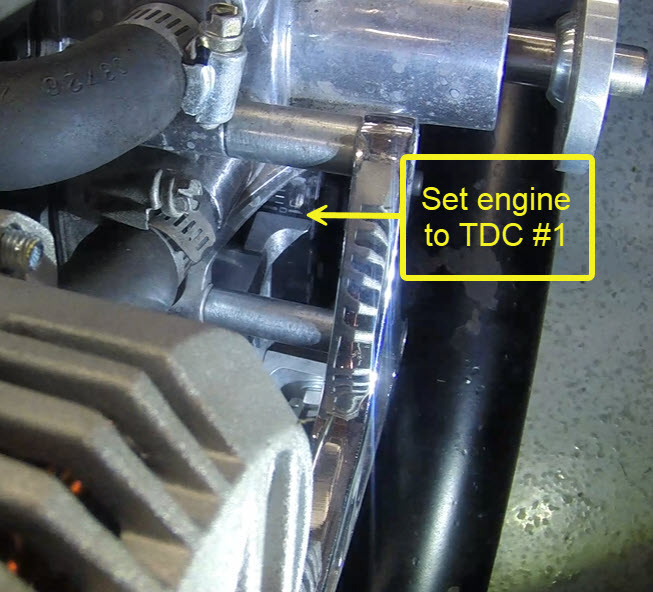
Once you have the bracket installed, align the adjustable pointer to the TDC mark on your crank damper. Next you'll position the 36-1 Trigger Wheel onto the front of the damper, aligning the #7 tooth (with mark) to where the crank sensor will be located. The wheel has multiple holes so you can rotate the wheel to accommodate your needs. I rotated my wheel clockwise one complete bolt hole to move the sensor up away from the lower part of the engine.
Next I installed the sensor bracket and sensor to line up with the #7 tooth. I use Digital Falling on my timing so the tooth was set to the "falling edge" (CW side) of the sensor itself. Tighten down the sensor bracket. Using a feeler gauge, set it between .040" to .080", slide it between the tooth and sensor, feeling for drag, then tighten the sensor locknut. I set mine to .050". You should then use a breaker bar or tool to "manually rotate" the engine making sure ALL the teeth on the trigger wheel clear the sensor. All timing adjustments will be done either here (moving the sensor CW or CCW) or within the Holley software, if needed.
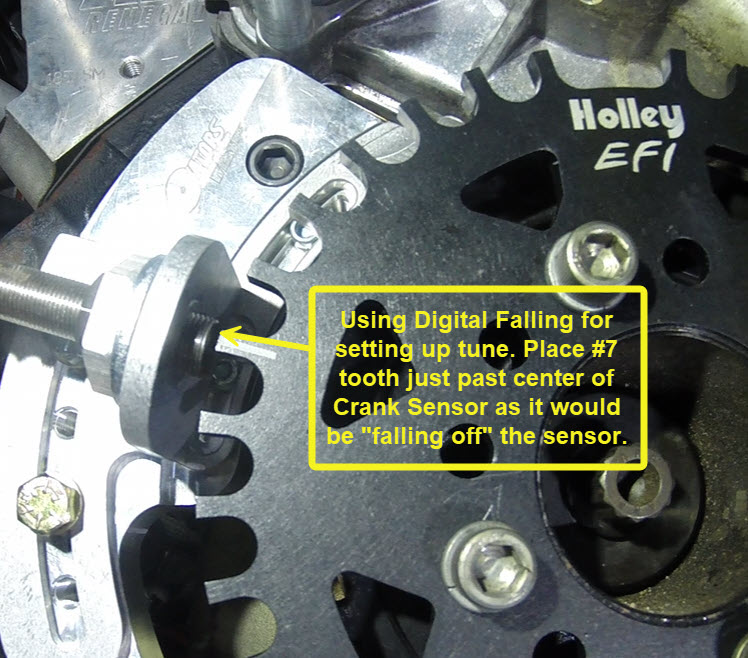
The next step is to initially phase the rotor to #1 plug tower on the distributor. I used my WOT setting of 34deg. to set my rotor. I rotated the crank CCW to 34deg. from TDC, then installed the cap where I drilled a hole between the coil tower and #1 plug tower, loosened the distributor and rotated it until the rotor was pointing at the midpoint of the #1 tower and locked it down. This can be adjusted once you start the engine...more later. The Dual Sync distributor doesn't have any mechanical advance, so it's fine for rotation only. If you were using a "normal" distributor, you would need to lock it out so the advance unit(s) are not being used. With EFI controlling spark in my case, rotating the distributor to insure the rotor is pointing to #1 during engine running does not effect any timing. It is just locating the rotor position.
Complete the wiring between the sensor and ECU harness and plug it in. Reconnect the plug wires (if removed) and make sure everything is set.
Now it's time to start the engine. Connect your timing light, set your software for static timing and enter the timing you wish to see. I use 20deg. because it's easy to see on my damper. Remove any software Idle Spark settings so the ECU doesn't try to adjust, then start the engine and note the timing shown on your damper with your timing light. It should read what you put for static timing. Mine read dead-on 20deg. You can rev the engine slowly a bit to make sure it stays put. If you need to make adjustments, you can do so at the sensor, or, use the Timing Offset in the software. This would be used for very small adjustments. If all is good you can now shut down the engine, remove your static timing and will then proceed to check your rotor phasing.
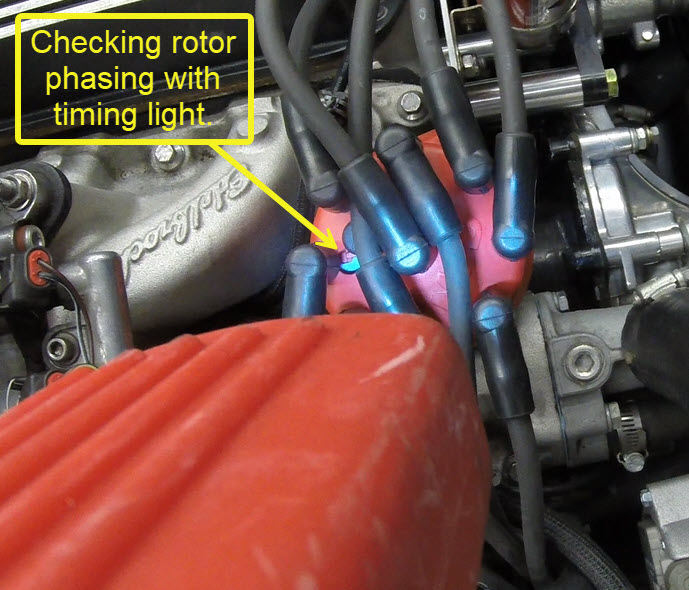
With the engine set to your timing specifications, you can re-start the engine and continue to monitor the timing. Now it's time to final check the rotor phasing. Using your timing light, rev the engine up to 3-4k RPM and watch the rotor through the hole in your cap by #1 plug. It should be pointing and steady at the #1 tower. If it's off just a bit, one way or the other, you can loosen the distributor and rotate it until the rotor is center on the tower or where you prefer it to be. Lock down the distributor. It will not be moved again. The timing is NOT being controlled by the distributor anymore. You are just insuring the rotor is pointing at #1 tower. Even when the engine is back to idle, the rotor will still be pointing to #1 and it should be fairly close to your high RPM setting. I set mine at the higher end due to the engine doing most of it's work in that area. It still fires on #1.
You should now be set to go! I also have a YouTube video of the installation/timing/tuning.
UPDATE: 6/28/2025
Got my crank trigger setup done and completed. I did cut the bottom 1.5" off the dogleg because I don't need it hanging down that low. I can still move the trigger wheel down and utilize the lowest point, but why? I'm keeping my sensor as high as possible out of the way. After re-install, I did a complete re-check of the system. Timing was set to 20deg. static and was spot on. I did my RPM test and it held solid so I didn't need to make any software timing adjustments. I proceeded to check my timing advance table and all was good. Re-checked the rotor phasing and that was solid as well so it was time to put it to the test.
I left my old tune settings alone just to see how close things would be. Putting over 100 miles on with a very good selection of driving, the system was sound. I didn't have the slight miss I was getting like before and I did take it up to 7k RPM a few times just to test the integrity. So far I'm very pleased and will continue over the next few weeks to test and hopefully be more confident in the system. It has always been good, but the Dual Sync distributor really made me gun shy for driving the car. I do think the Crank Trigger will do the trick.
As of now, the Crank Trigger is great! No miss, no hesitation, no breakdown and good solid smooth pulls in any gear. This is the best the engine has run since taking off the Ready-to-Run standard distributor years ago. The whole reason for going EFI spark control was ease of timing. I have made multiple hard pulls in 1 - 4 gears without a miss or hesitation. Feeling more confident now that it's behind me. As a side note: no wiring has been altered and/or changed since the Dual Sync, and has always been wired "as per Holley" instructions.
UPDATE: 9/28/2025
I can honestly say that the move to the Crank Trigger was a complete success! I've had multiple weekly runs to breakfast (60mi round trips), as well as a weekend trip with my Cobra friends to Lake Tahoe without any problems at all. In fact, the engine hasn't run this good since moving away from the Dual "Stink" Sync distributor. As I mentioned before, the MSD Ready-to-Run distributor ran better than the Dual Sync.
Performance has been great. The only changes I made since in my Holley software has been a small AE vs. TPS accleration table and minor AF Ratio settings in a few cells. Other than that, nothing and the engine has been flawless. I'm totally impressed and can now say (knock on wood), I have reliability back.
Picture below showing the Innovators West bracket installed with all pulleys and the bottom dogleg cut.
)
Well, another fuel change went on my new engine. I had previously been running the Mass-Flo for six years. No big problems and it's a good system. However, you need to spend some time at a dyno shop to get a really good chip burned, or, use a TwEECer RT as I did for the past three years to get the system to work at it's best, in my opinion.
I had been watching and studying the Boss EFI (now Powerjection) for some time and while building another car for a customer, bought the PI unit and installed it on the car. I can tell you it was no different than wiring up the Ford system due to a separate computer, but did have a few less wires to deal with. It performed to my expectations and then some. The system fired right up with just a simple tune from their website Powerjection and ran fairly well. I did do about 20mins. of tuning to get the A/F better and after that it was on the road to allow the system to "learn" itself with it's wideband O2 sensor.
After having such good results with the PI system, I decided to get the Powerjection for my car while my engine was out and being re-done due to a bad build from a local shop in town.
When the time came for me to deal with the fuel system, the newer Powerjection III system came out. The biggest improvement was the fact the computer module is now mounted on the side of the body. To top it off, there's only five wires that need to be connected to your harness. Battery power, ignition power, fuel pump, coil and ground. This is all done through a very nice plug-in harness provided to connect to the pigtail from the system. The system has it's own MAP sensor built in and is plumbed vacuum from a port along with a pigtail (with supplied harness) to connect to your laptop to run the software and mapping.
The included software is easy to use. Read the manual to understand operation and then set your parameters. Once that's done, you just start the engine and start to do some base tunning. It's not necessary, but will help settle the engine down prior to your first driving miles. The wideband O2 sensor takes a lot of guess work out of tunning and the system acutally teaches itself while you drive.
The PIII unit comes complete with a 8AN fuel rail setup although the connecting line is 6AN. I'm using 6AN fittings so I opted to buy a 6AN setup to install mainly because my stainless steel water lines interfered with their setup. The problem I did have installing my new fittings was the end bowls (that house the injectors), didn't have enough thread to install the fittings. I made a call to Powerjection and they sent two new covers which I installed and then connected my fuel line. I also installed a 250LPH in-tank fuel pump to replace my 190LPH one. The 190 is adequate, but I wanted to make sure.
The PIII is mounted on a Victor Jr. manifold. I happen to like this manifold and it's really good a top end. However, due to the stroker, the bottom end isn't hurt by torque or power. I'm using a Lokar throttle cable which fits fine and has plenty of adjustment while using the Russ Thompson throttle pedal in conjunction.
During the installation, I took out all of my Ford wiring harness and comupter. Weight reduction of 15#'s and a lot of clutter. I had some re-wiring to do but all in all wasn't bad due to the fact I love to do wiring and route systems. I have to make my lower air cleaner base opening bigger to accept a stock carburetor opening and I'll also be able to use a taller air filter. Not the larger K&N, but one from SB which will give me more airflow.
If this system would've been out six years ago, it's exactly what I would've purchased. It looks just like a Demon carburator and I've already fooled a few of our buddies with the PI unit I put on a customer car. The PI looks more like a carburator but you can't get that one anymore unless you find someone selling one.
After getting all the fuel lines leak free, I proceeded with the startup. I had already run the engine on the dyno after the rebuild and spent about 20mins. fine tunning the system so we could do some healthy pulls. The engine dyno'd at 403HP.
I started the engine and let it run while the water temperature came up and checked all other levels and leaks. Gladly, none to report. I took the car out for a quick 5min. run down the road to check everything and throttle response. All worked fine and I returned to check out the system.
I got my wife and out we went for gas and a longer drive. Everything worked fine. Throttle response is better than my Mass-Flo in my mind. It's a very smooth system but I didn't want to push much just given our initial ride. The next day we took it for a 70 mile jaunt to San Jose to meet the guys for breakfast. The system worked great and I can say I have nothing bad to report at this time. I'll be taking a few more runs within the next few weeks in preparation of our Santa Barbara trip in May with the bunch going to the Wheels and Waves show.
Out again for another break-in run. The system is really coming to life. Throttle response is great, idle is great and WOW! what a thrill to drive. It is flawless so far under acceleration and just plain ease on throttle control. I think it's still "learning", but overall is doing just as advertised.
NOTE:
As you well know by now (2025), this system has been obsolete for over 15yrs! Once a nice setup with some promise, went downhill fast. Lack of support and software, I believe lead to their demise. The best entry level EFI unit would be the Sniper 1 or now, Sniper 2 by Holley.
Old Fuel System (doubt this is still available or supported)
September 2004
I was never one to like the look of the stock Ford 5.0 plenum. It never seemed "right" in the Cobra and I was constantly toying with what to do. I like the vintage carburetor look and had to decide what to do. I had looked at Edelbrock, Accel and Holley speed density systems. I also entertained the thought of the "stack" speed density systems, but rulled them out because I want more air filtration. I had my mind set on the Accel system until Chris Richards at Quality Roadsters came up with his "Mass-Flo" system, which utilizes the stock Ford electronics.
)
)
)
)
)
I wanted to get this installed and tested before the annual "Snakes To The Lake" trip we take every year to Lake Tahoe. I feel this would be a great test for the system going from sea level to 9,000 ft. and back in a three day period.
With any new system there is always doubt on how it will work. This was no exception. I opted for the Victor Jr. manifold because I'm going to stroke the engine and wanted this for future use. This system also utilizes the stock Ford harness, computer and sensors, you don't have to get an entire new electronic system to monitor fuel loads.
All I needed to supply Chris was my engine size, cam and injector size. I did this by phone and an email. How easy is that! When everything arrived, I was quite pleased with the workmanship and quality of the product. The instructions were clear, but who needs those anyway, it was time to get busy!
I took my Cobra intake off and got the wiring out of the way. I taped off the ports in the head and then put the new Victor Jr. manifold on with four bolts to hold it in place. Now came the fun part, routing heater lines and fuel lines.
I used some 5/8" SS tubing for the water lines and was able to utilize my existing hoses to the heater and water pump. I installed a 90° water fitting in the intake manifold near the thermostat and then used a 90° hose to connect to the tubing. Using Earl's clamps, I connected the two SS lines together and they ran between the valve cover and fuel rails. Perfect fit!
)
)
)
)
)
I used Earl's fittings and SS hose to make up my fuel lines. I wasn't sure if I was going to like the system, but wanted to do a clean install anyway. The initial connections are not permanent as of this posting but do make a clean look under the hood. Using my existing fuel feed and return lines, I ran the feed into the right rear fuel rail, looped the front around the distributor and then out the left rear into a Aeromotive 13109 EFI pressure regulator w/gauge, which I had mounted on the firewall. From there it left the bottom of the regulator and back to the return line on the chassis. I also installed a fuel pressure gauge in the regulator from Summit Racing.
I moved the computer temperature sensor to the left front manifold and the air temperature sensor is positioned in the #8 intake runner. Doing this meant I had to move some wiring (my favorite part) to other areas. I didn't want to cut up the harness too much at this time so the harness was sanitized enough to re-route the wiring without making it look ugly. I'll change it all later.
The manifold was drilled and tapped in the rear for my water temperature sender and for a fitting to handle the PCV routing.
The air cleaner and mounting of the MAF and spacer were more of a challenge. I'm usign the oval Cobra air cleaner system and purchased the "non drilled" bottom design from Tony Branda. Once I figured where the hole for the MAF was going, I used a hole saw to cut it out. I then installed a 3/8" breather tube for engine venting in the base. I then had to modify and tack weld in the "bridge" that holds the entire base down.
The throttle body spacer had to be drilled and tapped (6-32) into the throttle body to keep the unit from rotating, which I found out when doing some testing, the engine would vibrate the entire mass, so that was necessary to keep everything in place. Not a big deal, but had to be done.
)
)
)
)
)
)
I'm using an A9L computer for this system as suggested by Chris. Once everything was connected, and I had no fuel leaks, I fired it up. It started fine and then it was on to adjust the timing and fuel pressure. I set the timing at 12° and fuel pressure at 40psi, which is what my Cobra intake system was set to.
I let the system cool down after running it for awhile. I need to see how a cold start was. Started the engine after a few hours and it purred to life. It smoothed out at a nice 1100 RPM to start off with and slowly came down to 800 RPM where it stayed. No hesitation and no stumbles during warm up. The system was better than my Cobra intake in that it didn't want to "hunt" when cold.
Once the engine got warmed up, it was great! Lot's of power, good throttle control (I adjusted my Russ Thompson pedal assembly) and the idle speed was great. No more hunting at idle! All I know is the engine wants more and it'll just have to wait until this winter for the stroker! When you hit the secondaries, you know it! It just wants more! I never got that with the Cobra intake.
I'll be doing another dyno run to see the difference between the Cobra intake the "Mass-Flo" system. The test will come after the STL trip in October.
July 2005
I just got through building up the new 331 stroker that'll power the Cobra. The "Mass-Flo" system will stay with the 30# injectors and recalibrated MAF. The engine started right up and when the computer re-learned the fuel mapping, everything worked great. I have to say, having the Victor Jr. manifold with the increased cc's really lets it breath life. I need to get some seat time to get used to the added power.
I plan to have another dyno run in the near future. I'm letting the engine get a few more miles on it before subjecting it to some extreme situations. I will have it on the STL trip again this year and can hardly wait to see how it performs again. I did take it to Hot August Nights again this year and did apply some "performance" situations, but nothing like what I'll be able to do on a track. That is coming up in October at Infineon Raceway and Willow Springs.
)
)
)
)
Here are some new shots of my reconfigured air cleaner. The base is CNC and hard black anodized. The center hole fits the MAF and the holes for the MAF and double-stud were drilled by me. This is made for a double wingnut air cleaner, but it will work for a single stud as well. You just don't have to drill for the two wingnut studs.
My MAF fits below my air cleaner and I use the lower configuration filter from K&N.
Snakes To The Lake 2004
The trip to Tahoe was great. NO PROBLEMS! NO ISSUES! NO NOTHING! This system works GREAT!
Driving up the mountain highways, the engine ran without problems. Every one thousand foot marker I stomped down on the throttle just to see if it would want to go faster. Yep! It did. Pulled and pulled and pulled until I ran out of engine. I did this all the way past 8,000 ft. before I felt comfortable about it's capabilities and just drove the car.
Another test was the first morning at lake level (6300 ft) and 32°. Hit the key and "varrooooommmmmm", she started and idled just fine. Cold driveablility was no worse than a stock EFI system at that altitude. In other words, it wasn't an issue.
Pushing the car through a lot of twisty's and hill climbs and downhill runs, it didn't miss a beat. In fact, I didn't even think about what was under the hood anymore, it just worked flawless. Response on the system is better in my opinion than the Cobra setup I was using. I do know it sure wanted more when you hit the secondaries.
I know there will be some who doubt what Chris at Quality Roadsters has done, but I'm not getting paid and I really don't care what the doubters think. All I know is it works, and it works well. If you're thinking about something other than the Ford EFI intake setup, the "Mass-Flo" is a good option to use with your existing Ford EFI electronics. The benefit is a clean looking "vintage" system and plenty of no-hassle driving.
I was in contact with Chris throughout the installation and testing period. I'm sure the feedback was helpful and if you had/have any issues, he's more than willing to help.
As a side note, I got over 22mpg. on the trip. I put over 650 miles on the system and was tickled to get that kind of mileage. Remember that a lot of the driving was well over 5,000 ft. for three days while driving the car hard at times and in the 3k to 6k rpm range quite a bit. Mileage in the Sierra's was over 17mpg!
Can this system be tuned beyond what it does? I think so, but it's not needed. You can drive it right out of the box!
I'm sure some of you carburator users know what it's like at 9,000 ft. and your engine won't run right. There were a few of them with that same issue. I didn't have any with the "Mass-Flo" system. Thanks Chris.
I'm checking with Chris right now to see if he would like to use a Cobra computer and setup a MAF unit for that combo. This should give him more to do.
)
)
Check out the dyno information here: dyno run.